Sunday, May 31, 2015

Raising the SIPs, Part 6: Raise the Roof!

So, today was finally the day we got the first two roof panels up. It turns out that the first two panels were actually pretty easy to put into place: we managed it with the help of three cousins and some blocking. 

The firs thing we did was measure and snap a line across the portion of the roof which would overhang the side of the tiny house, then we screwed two pieces of blocking onto the panel along this line so that the panel could rest on the tops of the wall, and the blocking would keep it from sliding over the edge of the wall and come crashing down to the floor far below.


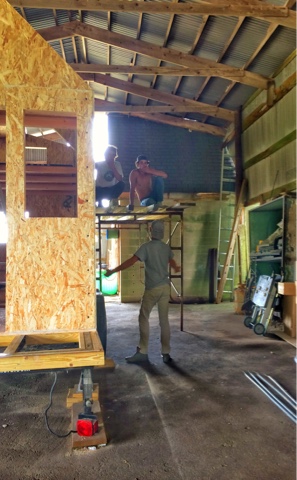
Then Team 1 picked up the panel and handed it off to Team 2, who were already positioned on the staging that Sam and I had set up next to the Tiny House for this purpose. 


The staging was really amazing to have- especially for this higher roof placement. It belongs to my cousin, but he was awesome and let us borrow it so we could put our roof up. 


Once Team 2 took possession of the roof panel, Team 1 climbed up into the sleeping loft area and helped lift the panel the rest of the way up into place. 


Although I think that because of the relatively flat pitch of the roof (14 degrees) we could probably have just sat the panel on top of the walls without any problems, I'm still glad we included the blocks screwed into either corner of the panel: this blocking kept the roof panel from sliding down from its perch, and if nothing else will be a great feature to include in the next two panel installations (the 12:12 pitch roof will be much more difficult, and the blocking will be the only way we accomplish it, I think). 


We repeated the process with the next roof panel, and that was it: our panels were up. We were able to let our lifting help go less than an hour after they arrived. To say that the whole process took only an hour would be incredibly misleading. We spent the next several hours playing around with the blocking and the ratchet straps trying to maneuver these panels into exactly the right position. That seems to be a recurring experience with the SIP panels: the big exciting work takes almost no time at all, and then for the rest of the afternoon you're left taping them together trying to get them perfectly positioned down to the fraction of an inch. 


But, we finally got them into place, glued, screwed and nailed them down, and we were left with the ceiling to our sleeping loft. 


Friday, May 29, 2015

Loft Beams

We figured that having the loft in place would be a big help when placing the roof panels, which means we need to place the loft beams to place the loft. The beams will be the first thing that we've installed that will be visible in the finished house, so we took a little extra time to sand them before the installation.


The actual installation was pretty simple- we followed the process that Joe Coover describes for placing loft beams in a SIP Tiny House here. It worked great. At the end of the day we threw an extra sheet of OSB over the newly installed beams and viola- we had a loft! 


Wednesday, May 27, 2015

Raising the SIPs, Part 5: Troubleshooting the Cheek Walls

Two more panels up today- and although they were small, they made sure we worked for it. Today we installed the "cheek walls" to the Tiny House. A cheek wall is the name for that section of wall that will form a triangle between the less steeply pitched dormer roof and the normal roof pitch. It looks like all the small mistakes we didn't notice we were making up until this point decided to make themselves felt, and unlike the rest of the panels, these two didn't just slip perfectly into place.


So we (well, mostly Sam- we only have one ladder inside the Tiny House, and he's taller and stronger than I am- so I was relegated to the role of photographer/gopher for most of the day) set ourselves to the task of bringing the two panels into alignment with each other. 


Fortunately, the displacement between the two panels wasn't too bad, and with the help of his trusty bar clamps and a good old ratchet strap, Sam was able to bring the ends together.


Shortly after this photo was taken, we had to disassemble the whole clamp/strap rig in order to apply some construction adhesive between the panels, and then reassemble all the clamps that the strap to keep the panels in place while Sam nailed the hell out of them. Once we were done, they were securely fastened in the correct alignment, and we were pretty proud of ourselves.  

Tuesday, May 26, 2015

Flooring...

So, because the time has come to get a door made for the Tiny House, we have to pick out flooring. I know, at first glance that doesn't make much sense, but it turns out that in order to make a door, you need to know how high to make a door, and in order to know how high to make a door you need to know how high off your subfloor your flooring will be, and in order to know that, you need to know what you're using for flooring.

We investigated several different options, and it really came down to Cork vs Bamboo. In the end we decided to go with engineered bamboo because it was a) much cheaper than cork and b) deals with changes in humidity and wet locations better than most cork options (and pretty much all the semi-affordable options). Dealing well with changes in humidity was a really important factor to us because we'd like to use one flooring throughout the house which means that we'll be using it in the bathroom. That may not work out, but we figure that if things start to go south we can always put a vinyl flooring on top of the existing wood flooring in the bathroom (which is only like 10 square feet anyway), so even if we have to tear it out it'd be worth it to give it a shot. In the living room, we'll have the opposite concern: heating the tiny house with a woodstove in the winter can really dry wood out, so having the engineered stuff will definitely help there as well.

Here's a photo of the bamboo we've temporarily settled on. It's actually a lot less red in person (looking more yellow than anything else). It also has the most phenomenal texture- which I think is maybe the real reason why I wanted it.


And for tone comparison, here's a quick shot I took at Home Depot. 


Monday, May 25, 2015

Raising the SIPs, Part 4: The Gable End

We finished raising the SIP walls with the forward gable end. The video below is a time-lapse of the process, which I think demonstrates the time we spend on each part of the process nicely. For each of the walls, the actual raising of the SIP took very little time, followed by an hour or so (two hours in the case of the first wall we raised) of fiddling with it to get the placement just right. The ratchet straps, our 4' level, and several sledge hammers have been key in these adjustments. 


Now that we have all the walls up, the only SIPs we have left are the four roof panels. We're going to wait to get those up until after we have the loft joist installed so that we can have a platform inside the house to stand on as we get the roof panels into place. That'll be our next action step. 

Saturday, May 23, 2015

Raising the SIPs, Part 3: The Forward Wall


Sam will have more on this process in a bit, but I just wanted to post this photo: we've got all the side panels up (and over the wheel wells sucessfully) and we're moving on to the forward (and final!) wall. 

Wednesday, May 20, 2015

Raising the SIPs, Part 2: Preparing the SIPs for the Wheel Wells

So, when I last left you we had gotten the first three SIP panels up on our trailer, and the next step was to prepare the next sections of wall to go over our curved sill plate above the wheel well of the trailer.


We started by cutting out a stensil we had preppared for ealier (before we put the flexible sill plate over the wheel well) by holding a scrap of OSB flush against the subfloor sheating and tracing the wheel wells onto it. We had two stensils, one for the right wheel well and one for the left. We were careful to lable which was which, as well as lableing front and back on each one. Sam used our jig saw to cut along the tracing, which then gave us a peice of wood with a curve that perfectly mirrored the curve of the wheel well. We could use this to mark where we would have to cut our SIP panel skin so that the panel will slide over the wheel well nicely. 


Now, it actually turns out that there were two panels on each side (so a total of four) which we would need to cut curves from: a 12-inch long panel and an 8-foot long panel. (The long walls of the SIP panels were designed this way so that no individual peice would be wider than 8'6" when flat packed onto our trailers since loads wider than 8'6" need an oversized load permit to drive on the roads). We started working on a 12-inch panel first. We measured out how far from the start of the panel the wheel well started, marked that distance on the bottom of our panel, and then lined up our stensil with the bottom of the panel at that mark. We scribed a line along the edge of the stensil onto the skin of the OSB and cut along that mark with the jig saw. We then did a rough foam removal, below Sam is using a chisel to clear away some of the foam.


We only cut through one side of the SIP because the inside skin will slide along the inside of the wheel well sill plate and rest on the subfloor sheathing. From the inside, you won't even be able to see where the wheel well is. 

The next step was to fur out 1.5" of foam in from the cut end of the outside SIP skin. (This opens up the space that the wheel well sill plate will occupy). Professionals use a Foam Cutting Tool for this job, which is a peice of electrically heated wire (like you see on an electric stovetop) in the shape of a rectangle, the width of a 2x4, with an adjustable depth stop. This device will melt away the foam insulation from a SIP perfectly to the depth you set it to. But we're not professionals, and we didn't really want to by a tool that would really only be useful working with SIPs. So, instead we improvised with a hand weeder and a blow torch. 


It worked great! We didn't get the same kind of precision that you could expect with the proper tool, but we're planning on drilling into the OSB all around the wheel wells and injecting spray foam in there to fill the gaps up anyway, so this doesn't bother us too much. 

Having found a system that worked, we repeated the process on the larger panels. 


Now we've just got to reassemble our lifting force and get these panels up! We plan on raising them exactly as we did the last two.

***EDIT***
One very important mistake that we made and didn't realize until we were trying to set this panel can be seen in this photo clearly: You can see that we furred out the foam an inch and a half in from the cut skin, but we left the 2x4 at the same length as the skin instead of cutting it down the 1.5" to match the foam. BIG MISTAKE! We tried to set the panel like this, and were wondering why we couldn't get it to rest on the sill plate properly... well, once we realized that it was because there was this inch and a half to 2x4 in the way we felt pretty dumb. Cutting it down was a mess (we had already put construction adhesive over every thing) and bent one of our jigsaw blades. Fortuantely, our lifting crew was SUPER AWESOME, and put up with all of our ridiculous mistakes even though it was a cold and rainy day our and they all wanted to go inside and get some lunch (as did we). The good news is that eventually we got the 2x4 cut to the right place and got the panel on properly.

Saturday, May 16, 2015

Raising the SIPs, Part 1

OK! BIG DAY TODAY: 

Having conquered the challenge of the Sill Plate and the Wheel Wells, we moved on to the most exciting part of our build yet: raising the SIPs! The day started early, with us checking our materials, counting out our SIP screws, and making sure that absolutely every thing was ready for when our lifting crew arrived. 


My amazing family started to show up around 10 to help out. These are only the Early Birds, we ended up having about 6 to 8 people around for any given part of the lifting, although folks drifted in and out of the work site all day. I wish I had been able to get a photo of all of us.


The first wall was definitely the hardest: without any other parts of the structure to support it, it had to stand on its own (or rather, with the help of two support braces), and it had to be perfectly level and plumb since it was the wall to which all the other walls would be erected to match. Thank goodness my Uncle Chuck (Carpenter Extraordinare) and his Magic Laser Level were there to help. Seriously, every one was amazing, but without Uncle Chuck, I don't think we could have gotten this thing up. 

Here's my first experiment with Time Lapse photography, which captures the first wall going up: actually getting the wall vertical takes up maybe the first 5 minutes of the experience, the remaining two hours were spent making tiny little adjustments in the walls positioning to make sure it was exactly centered, exactly level, and exactly plumb. 


We finished getting the first wall in place and secured around noon and we sent the lifting crew back up to the house for lunch.  While our hard working lifters got on with their day, we prepped the first wall to recieve the second. This involved drilling holes in both the standing rear wall and the incoming side wall panels so that the electrical chases would run from panel to panel...


... and predrilling the standing rear wall at 12" intervals where our giant 6" SIP screws would go to hold the two walls together. 


Once we had both the standing rear wall and the two side panels prepped, we called the troops back. Fortunately, these next walls were much easier as we just had to marry them up to the rear wall. Because we had spent so much time and effort to make sure that the rear wall was perfectly level and plumb, once we got these walls to line up with the rear wall they were also plumb and level. It took about half the time to set a side wall as the time it took to set the rear wall.


That's not to say that it was perfectly straight forward: 


It turns out that the side walls had taken a slight bend since we picked them up from SIPs of America, but with a little frig-rigging, we were able to straighten that out. Pictured above, my cousin Janie casually holds the wall in place and checks her phone while two other cousins jump up and down on a peice of 4x6 lumber to put pressure on the top of the side wall to bend it outward. When this proved not to be enough, my dad stood beneat the two cousins on the plank and started wacking the wall with a sledge hammer. Not seen in the picture is Sam, who is  screwing the SIP screws into the side wall through the rear wall from the bottom up as we slowly bring the side wall more and more in line with the edge of the rear wall. It all sounds really chaotic and difficult- but it wasn't really. Every one was laughing and having a good time, acutally. It took us maybe an hour to get this wall up, set, and screwed in place. The third panel followed easily. 


Once we got both side walls up, we sent the lifting crew home for the day. Their work was done. These three panels together were really steady, holding each other up against the wind, so we didn't feel the need to get any more up that day. Also- it was getting late and we still had one job left: it was hammer time.


Driving 12d ("12 penny") nails every 6" along the inside and outside skins of the all 3 panels at the level of the sill plate was perhaps the most grueling part of the entire day. Our hands, wrist and forearms ached more and more with each strike of the hammer. Even the thrill of using my great grandfather's hammer to buid my own house wasn't enough to dull the pain. But we got through it, and finished the work day with a well deserved rest inside the beginnings of the Tiny House. 


We knew we would have a breif respite from all the lifting and nailing tomorrow since before we can fit the next panels on the sill plate, we need to prep them from going over the wheel well- but that's a different kind of effort, more mental than physical as we problem solve and trouble shoot. So, I'm going to get to bed now. Nighty' night.

Friday, May 15, 2015

Sill Plate, Part 2: Wheel Wells

Getting the sill plate up and over the wheel wells was by far the most technically challenging task we've faced in this tiny house build so far. The method that our go-to Tiny House Sip Construction expert, Joe Coover, recommended was to find a "flexible 2x4" and bend it over the wheel well.

Well, we looked all over Home Depot, and I couldn't for the life of me find any type of 2x4 that I thought was flexible enough to bend. What we find was this fabulously bendy PVC material that came in 1x4 planks. Doubling up on these gave us the exact dimensions of a 2x4.


In order to figure out the angles at which each of these boards would need to be cut, Sam traced the wheel well and the dimensions of our sill plate material onto a peice of scrap OSB, and then used ~The Power Of Math~ (I'll try to get more details on this process later) to figure out that we needed about a 44-degree cut on each of the end of the 2x4 which would but up against the flexible sill plate, and at both ends of the flexible 1x4s.


A few cuts later and we tested the flexiblility of the PVC board over the wheel wells for the first time. We found that they were a little too stiff to bend. Fortuantely, Joe Coover came to our rescue (again). His flexible material had been slightly too rigid as well, and he found that by scoring one side of it and heating it up, he had been able to bend it over the wheel wells just find. We didn't really have any good method of heating up our PVC, but we could score it, so we figured out how to use the depth-stop on our chop saw and gave it a go.


As you can see here, it worked like a charm and the 1x4s bent over the wheel wells beautifully. 


The next step was to figure out where to cut the other end of the flexible boards. I wish we had some really sophisticated method for getting this right, but unfortunately, it was just a big game of guess-and-check for us: one that twice ended up with us cutting a board too short. But by going slowly, shaving down each board by ever smaller amounts and checking the fit after ever cut, we got there. 


At the end of the day, I was immensly pround of our work. We bolted the flexible boards to the wheel wells to keep them in place, and we secured the sill plates on either side to keep the boards properly bent. I think it turned out great.


Wednesday, May 13, 2015

Sill Plate, Part 1: The Straight and Narrow

OK- we got back on track today and started our sill plate. The first part of the process was to measure and mark out the lines we would use the position the 2x4s that will make up the sill plate. 


It's really imporant that these lines make a perfect square, so we triple checked them. After measuring in from the sides 4.5" on each face and marking lines, we checked to make sure that these lines formed 90-degree angles to each other: first we double checked to make sure that each length was the same as it's counterpart across the trailer. Then we pulled what's called a "3-4-5" triangle on each corner: if one leg of the triangle is 3' and the other is 4', then (if the angle between those two legs is 90-degrees) the hypotenus will be 5'. Fortunately for us, each of the corners made great 3-4-5 triangles. Finally we checked the diagonals across the trailer. They were equal. We were square. 


This meant we were ready to start the next part of the job: actually placing the sill plate. Today we kept it easy and just did the portion of the sill place that didn't involve the wheel wells. No angled cuts, no curves to negotiate: just putting a (hopefully) straight piece of wood down on a straight line and securing it there. The most difficult part was figuring out where to drill holes for the trailer attachement bolts to go, but this didn't take too much extra work. We just placed the 2x4 next to the bolts, marked where they were on the length of the wood, measured how far in from the edge of where the 2x4s would sit the bolts were located, and marked that spot on the wood.  Then we got to "drill, baby, drill" (the only time I've endorsed that course of action). 


Tomorrow we'll have to start problem solving and figure out how to get the sill plate over the wheel wells. 


Tuesday, May 12, 2015

Best Delay Ever

We had intended to really push to try and get our SIP walls up over the weekend, but late last week we got news that put all thoughts of the Tiny House on the back burner. Back in January, our nephew Francis was born 17 weeks early. At just 23 weeks gestation, he was fortunate enough to be born at Women & Infants Hospital, where an incredible NICU team pulled off one medical marvel after another to help stay alive. After spending 118 days in the NICU, Francis was finally able to come home yesterday. We were all so excited when we heard he was coming home that we paused our work on the Tiny House to get ready for his arrival. Now that he's back on the farm, we'll be resuming our building projects. 

Saturday, May 9, 2015

Subfloor Part 3: Subfloor Sheathing

Once the fascia was attached to the trailer, the next step has been to put our subfloor sheathing on top of the trailer. We have a 3/4" CDX T&G OSB subfloor sheating.  


One would think that the most challenging part of this process would be cutting the OSB to fit around the wheel wells, or perhaps getting the runs to be perfectly straight and square along the length of the trailer. For us, however, the most difficult part of the process was attaching the subfloor sheating to the trailer. We ended up snapping at least 4 drill bits- you can totally forget about the 'self-tapping' feature of our OSB-to-Sheet Metal screws. But we did manage to get it on in the end.


The next step will be to measure and mark out where the sill plate will go and then we'll get our SIPs up!

Wednesday, May 6, 2015

Subfloor Part 2: Trailer Fascia

Feeling mostly recovered, we went back to work today. Having installed the subfloor insulation, the next step in the process was to attach fascia boards to the sides of the trailer. This fascia will consist of a 2x4 screwed directly to the metal of the trailer, and an additional 1" thick board screwed into the 2x4. Together, these two boards will bulk out the trailer by 2 1/2" on each side, to extend our building space. 


The first challenge we faced was actually getting the screws we needed to attach the 2x4s to the trailer. We had purchased special self-tapping plywood-to-sheet metal screws for this purpose, but quickly found out that the "self-tapping" feature didn't work so well, We ended up clamping the boards to the trailer, I went around the edge drilling through the 2x4s and into the metal with a titanium drill bit, while Sam followed closely behind, securing the board with screws. Even with the pre-drilled holes, it took a lot of muscle to get the screws into the metal. I'm glad it was Sam who had to do it all and not me. 

Once we had figured out how to get the boards attached to the trailer, the next challenge was to fit the boards around the wheel wells and the all-threaded rods which were welded to the outside of the trailer. (These will later be used to bolt our sill plate to the trailer, but for now they're just an annoying thing to work around). 


Several cuts with the miter saw on a piece of scrap lumber helped us determine that a 24-degree angle was needed to marry the fascia board to the wheel well. After that, we marked the position of the threaded rod on the board, Sam gave it a few cuts with a skill-saw, and chiseled out the rest.


We needed to finagle some of these channels to be deeper or wider than we had originally marked, but mostly it was a straight forward process and after Sam and chiseled out the furrow, they sat nicely against the trailer. 


We're pretty much done with this step- although we still have the porch to handle, I expect we can get that done tomorrow morning. Once it's handled, we'll be moving on to the subfloor sheathing!

Sunday, May 3, 2015

Lessons Learned While Placing An Order at Home Depot

Sam and I have had to put the build on the brief hiatus while we recover from a particularly un-fun chest cold. Today's the first day that I've gotten out of bed since Tuesday (Hurray!), so we haven't made any real progress on our Tiny House since installing the subfloor insulation last Saturday (Boo!). While I don't have any progress to report on with regards to our build, I thought I'd share 5 of the lessons I've learned so far while placing orders at Home Depot.


1. Use The ProDesk

If you place a large enough order ($2500 worth or more to be precise), you qualify to place your order through the ProDesk (even if you aren't a construction professional), and have it sent to "the bid room", this process takes a few minutes, but it results in you being offered a discount on your large order. Last week, we saved about 10% on our first $3000 bulk item purchase. Needless to say, we were happy about saving money- but there were other benefits to placing the order through the ProDesk as well.

The largest benefit (from my perspective) was that we didn't have to run through the store gathering all the items for our order ourselves. Instead, we just went through the store, noting the SKU of each item we wanted and the number of items we wished to purchase on a list. (If you're familliar with the items you want and are comfortable picking them out from Home Depot's website, this whole process can be done online). At the end of our shopping, we presented this list to the ProDesk associate, who entered it into the computer and got us our discount.  Then we were done. We arranged a time for delivery of our order to the build site (We decided to 2 days after we placed the order, but it could have been even sooner than that), and the Home Depot staff managed the rest. Sure, this meant we couldn't site each board that was in our order, but the effort saved was worth having to return a few twisted boards.

The other big benefit that we took advantage of was the ability to add items onto our order for 5 days after we placed it. It turns out that even with a detailed materials list in hand, we still forgot a ton of stuff that first day, and ended up going back to Home Depot several times to add things to our order. (These things we did go through the store and pick out ourselves, I don't know if it's an option to have them schedule a second delivery, my guess is that they'd probably do it, but charge a fee). It looks like this is something that not every one at the customer service  desk knows how to do, so you might spend 30 minutes standing there while they hem and haw over it, but it gets done in the end. You get the same discount applied to the add-on items as you received on your initial bulk order.

2. Bring A Materials List

Thinking about all the items we had to add onto our order brings me to my second lesson. Bring with you as complete a materials list as you can compile. True, it probably won't have everything on it because we humans are imperfect creatures who end up with simple problems like "Oh, I bought 5000 nails, I should probably have looked into buying a hammer as well...", but having as complete a list as possible will keep moments like this to a minimum.

Some items on our list were so simple, we were able to look them up online, get the SKU for the item, write it down on our list, and not think about it again (that is, we didn't bother looking them up in the store as we already had all the information we needed to order it at the desk). Other items we weren't as familiar with and so we didn't feel as comfortable shopping for online, so we would find the section of the store and browse a bit- ask a few questions of the associate in the area, and compare similar products to figure out which one is the one we needed for our project.

Organizing our materials list by general department (tools, lumber, fasteners, etc) helped keep us organized and focus, and saved us time, but going through the list was still a very lengthy process, which brings me to my third lesson...

3. Take Your Time.

Next time I have to place a bulk order at Home Depot, I'm going to devote an entire day to the process. Not that it will actually take me a whole day, but the last thing I want to interfere with me making the purchases I;ll need to  complete the Tiny House is thinking about all the other things I was supposed to do that day while struggling to get through my list. Ordering several thousand dollars worth of construction materials takes time. Period. Rushing through things results in mistakes, in buying the wrong items, missing items, and ultimately it takes more time to correct these mistakes than it would have done to just take your time and do it right the first time.

4. Find Your Own Items

It wasn't until several trips to Home Depot had passed and I finally embraced the lesson of taking my time that I found the value of actually selecting your own items. Initially, my go-to strategy for my Home Depot shopping was to find the department where the item I wanted was located, find the sales associate for that aisle, and then explain to them what item I wanted and let them locate the item within their aisle. I figured this was the most efficient way to do things, and I'm sure that any one who's had the intimidating experience of an aisle filled floor-to-ceiling with nearly identical boxes of nails and screws has had similar ideas. But, it turns out, this isn't really a great plan.

The example of the fasteners aisle is actually a great example from our own shopping trip, and I'll use it to explain why relying on the sales associate can be a mistake. It starts with the assumption that the sales associates know every item in their assigned aisle. This turns out to be sadly unreliable, but it is an assumption that I held when I went in to make our first bulk order. Thus, when I saw "2 1/2 inch Self Tapping Screws x 300" on my materials list, and I saw the sea of different screws, I went to the associate in the fasteners section and asked him where I might find 2 1/2" self tapping screws. He took me to a section of the aisle where there were a variety of self tapping screws, and we found that Home Depot carried boxes of ten 2 1/2" self tapping screws. I asked if they came in bulk, and the associate told me no. Because I was in a hurry (I hadn't learned lesson #3 yet), I didn't bother to double check this, and didn't really look too closely at the screw either. Instead, I just ordered 30 boxes so that I could get our 300 screws and move onto the next thing on my list.

It wasn't until the screws were delivered that a good friend who was looking out for us and is more familiar with construction than we are took a look at the screws that we were aware of a problem. The screws were hex-head screws, which meant that the head of the screw would protrude about 1/2" above the surface of whatever it was screwed into. As were were going to use these screws to attach our subfloor sheathing to the trailer, it was kind of important that the screws were at least close to flush with the sheathing so that we could then install the proper floor on top of them. So, we went back to Home Depot to see if there was any alternative.

My first move was to go to the associate in the fasteners aisle, and asked him if they carried any 2 1/2" self tapping screws with normal heads. He directed me again to the section with the small boxes and bags of self tapping screws, and we were able to find a bag of five 2" self tapping screws with a normal head, but according to the sales associate, "that's the best you're going to find, I'm afraid.". In the time that it took for us to come to this conclusion, Sam and gone off on his own to a different section of the aisle and found a 5-pound box of flat headed 2 1/2" self tapping screws specifically for wood-to-metal connections. We bought two of the 5-pound boxes, and haven't relied on a Home Depot sales associate's advice since.

5. Relax.

This lesson is more subtle than the others, but I think it may be the most important. If you can't relax, you can't really take your time, and if you can't take your time, you're not going to do a good job of selecting which product is best for you, and in the end you're just going to make more work for yourself. I've found that one of the things that makes it hardest for me to relax in Home Depot is the loud noises inside the warehouse like building. Taking this into account, the last several times I've needed to focus in Home Depot, I've brought out my earbuds (which block out a lot of the ambient noise) and listened to some quiet music while deliberating about my potential purchases. Perhaps for you, relaxing involves bringing a water-bottle or a snack into the store to make sure you don't get dehydrated or hungry while shopping. Maybe it's as simple as making sure you go to the bathroom before you start shopping- having to pee really makes it hard to take your time and focus on the decisions in front of you. Whatever these steps are for you, just take a few minutes to think them through before you set out, and do what you need to to make sure that you'll stay relaxed and comfortable throughout your shopping trip.

That's it for now, I'm afraid. I'm sure that there will be more lessons learned as we continue with this process. I look forward to figuring out what they are.